Leggings Adjustments
Pelvic Tilt, Touching Thighs, Low Cheeks ...
I want to talk about the problems you can have fitting centre seam style leggings. The most common cause of problems for this style is pelvic tilt, but it’s easily resolved with a pelvic tilt adjustment (link to website). This adjustment should always be done before any other when it comes to leggings … and it’s much better if you get it right on a toile before you attempt any other type of adjustment, as fitting problems in leggings can compound quickly and create hard to interpret results. I would also like to point out that the rules for adjusting non-stretch pants aren’t always correct in stretch leggings … there isn't three dimensional tension in wovens.
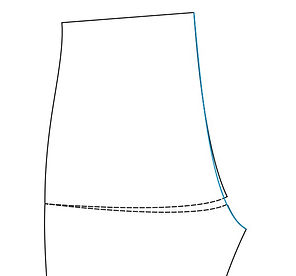
The second most common problem is thighs touching close to the crotch height. To understand how this impacts the pattern, first we need to see how the ready to wear pattern functions. Obviously the crotch has a certain width, and centre seam leggings, by concept, do not … the pattern does not have a flat sitting gusset but instead must distort to sit flat over the crotch. In the left image below I’ve drawn the theoretical pattern coming to a point at the crotch … the red arrows show where the highest unbalanced tension on the front occurs when the garment is put on (assuming tilt is correct). It’s typically the same line as the front leg crease although may be a little shallower or steeper, but it will always point to either side of the natural crotch width. That equates to a garment that in reality pulls the point into a flat area over the crotch and into the crease, shaping both the crotch and the leg, if we’re lucky! (see right image)

What you will frequently see are a few radiating ripples along the crease line. These are actually very narrow extension and shear ripples all-in-one because the centre seam line is really trying to move slightly backwards while the tension around the body and leg is trying to pull forward along the crease to the side seam. The rippled area is over extended along the crease but lacking in tension perpendicular to that line, hence the radiating ripples. They are best reduced by slowly increasing the length of the centre front line to reduce the tension along that line and by increasing the tension perpendicular to the line just slightly by drafting the new curve to match the bottom of the cut not the top (see the little wedge that’s being cut off below). That’s in a normal situation where these ripples are the only thing that present after you’ve done a pelvic tilt adjustment. If they occur along with other fitting problems then we may need to view the remaining problems as a whole before making this little adjustment.
In regular ready to wear, the inside leg drops straight down from either side of the crotch or not too far inwards, and we’ve seen the centre seam flattens across the crotch under tension ... you need to understand this is a distortion of the original pattern, an acceptable amount of distortion that the pattern can bare, but understand it’s a still a distortion. This means the pattern can only bare a small amount more of distortion before other problems begin to arise. It’s when you get cumulative fitting issues that they become harder to fix!
Years ago, the crotch area of the pattern sat a couple of centimetres or so below the actual crotch … back then the fabrics didn’t perform as well as they do now so if you didn’t lower the crotch then you’d get cut in half during movement … not only was it uncomfortable but it wasn’t seen to be something you should be proud to display (I’m not sure how to say that politely sorry)
Let’s get back to the touching thighs. In this case the thigh is trying to stop the flattening and working against the tension along the leg … that tension still exists so what we see is the front ripples change in angle from the crease and turn more toward the centre (they get steeper) and they move more centrally as well. The upper thighs are literally squeezing all the fabric that was designed to flatten out (and is still trying to under tension) together in the middle … the ripples may even start to look like folds. The tell tale sign is that the top of all these ripples or folds are all the same height (see image below).

The other problem that almost always accompanies touching thighs near the crotch is a lower then normal crease under the cheek at the back. It has nothing to do with pelvic tilt although can be exaggerated by posterior tilt. Now a lower cheek crease than crotch height is actually normal contrary to what people believe … what I’m talking about is a lower cheek crease than normal. Depending on how much height difference there is you can get all sorts of different effects. At regular crease height the garment can still adapt although you may still see some slight rippling close to the back crotch (left image below).
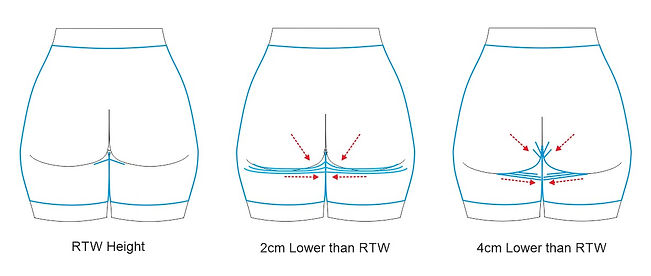
When cheeks start to drop and round, a rapid change in the garment occurs. Because the crotch can’t go any higher the garment technically has to stretch an area designed for leg circumference over the top of the cheek. Practically that doesn’t happen, instead the whole lot moves to an area of lower tension under the cheek creating long ripples parallel to the cheek crease that curve up slightly toward the crotch.
If you drop the cheeks further still a whole new set of ripples appears (right most image above). By going down further, eventually the back crotch curve has no choice but to suddenly fall between the cheeks to relieve tension … and tension does see a sudden drop now that the garment has somewhere to go. You get ripples radiating upwards where the garment starts to fall between the cheeks … they aren’t long and they do radiate along the centre back seam (they’re actually folds that are the fabric doing the equivalent of darting to create the 3D curve over the inside cheek). Because the upward tension is relieved but the circumferential tension around the thigh is not the ripples under the check end about mid cheek and point horizontal to slightly downward instead of up towards the crotch. This change of ripple pattern happens at the point at which everything falls between the cheeks due to low cheek crease relative to crotch.
How do we fix it? Well the old way was simply to lower the crotch level on the pattern and that works really well, but you get a little gaping at the front. I figure that’s way better than the above mess of ripples at the back. Back in the aerobic 80s that was the way we did it and all was good because they put a thong leotard or panties over the leggings that fixed the gaping. But more recently if there’s gaping under the front crotch the garment won’t sell.
Instead the best way to fix it is with multiple shaped panels (like a bra for your cheeks) that can put the contours exactly where you want them and leave the crotch high at the front.But if you’re a home leggings maker with limited pattern making skills how can you adjust a ready to wear leggings pattern to reduce the problem (you won’t eliminate it completely without extra panels)? Well what do we need? We need more width for the thigh right under the crotch point, a lower crotch point and a longer crotch curve without changing tilt.

Sounds hard but actually it’s quite easy. On the back block we draw ourselves a whole new centre back curve and inside leg that creates all three. Our first consideration is the extra width for the top thigh. Do we want to put all of it in the back or some in the front and some in the back. Well if we’re dropping the cheek then we really want it all in the back and keeping the front high, but you can move some of the difference to each. In this example I’m putting it all in the back ...all 6cm of it that you see in the image above left!. I’ve also dropped the back crotch point 3cm. Normally I’d do 2cm increments and test each but this is just an example. Note that my adjusted curve in blue still has the same 90 degree corner?
We then put the front and back blocks together at the inside leg, rotating our way up from the knee so we know our seams are trued before we start (right image above). What we’d have then is a new back curve that doesn’t line up with the front so we need to smooth it out such that the full depth change of the back curve is retained and the front curve still goes through at the original height or close to it (red line). That’s really all there is to it.
That won’t be perfect but it will fix most of those ripples. But if we want a better fit we’re going to need a gusset or try a multi-panel approach. That will be in the next tutorial.