Truing & Finishing
How I Know If You Know What You're Doing!
While it seems the most obvious thing of all, it's also the most forgotten ... and it's how I initially tell who's an amateur and who isn't! This article is stuck on the end of my introductory section for two reasons. Firstly it's here to remind you that when you go through all the pattern making lessons to come, that you'll need to consider how two pattern pieces fit smoothly together .... at every seam ... and with respect to the overall tension in the garment. We've gone through tension already, but I can't stress enough that it's everything when it comes to designing for stretch fabrics.
Secondly, this is exactly how you can tell if your online PDF pattern designer knows what they're doing or not ... or more importantly if they're a self taught amateur or a professional. Truing up seams is the first pattern making lesson anyone does at fashion school. The teachers go around to every student and overlay their patterns front to back, seam to seam to check that their seams are the right length and flow smoothly from one piece to the other .... and they do it over and over again until we get it right. And they do this for three to four years, never once letting up. If we get even one seam of a pattern untrue ... we didn't get marked down, we got a zero. Now I'm told things have softened a lot in the last 30 years but really they shouldn't have. If you can't get this basic theory right after three years then you have no place being a pattern designer.
But self taught individuals who watched a few amateur YouTube videos before deciding to sell patterns will never have been taught this, so their work goes out for sale with these simplest of errors that create poor fitting garments all the time ... I see them everyday. But they won't realize that their poor pattern making has caused weird shaped garments, skews, unsightly ripples, flipping elastic or seams that roll to the wrong side .... they always assume it's something that the sewist did wrong or the wearer has an unusual body type ... it couldn't possibly be the pattern!
I'm going to show you the most commonly made mistakes and the visual effects that result, so you can recognize them and fix them in your own work ... or know when you're dealing with an amateur that still doesn't know.
So what is truing up a pattern? Truing is where you make the stitching line on two patterns pieces, to be sewn together, the same length. Finishing is where you make one pattern piece flow smoothly into the next. Sometimes people refer to both truing and finishing as just truing and that's OK too ... I tend to use the words separately as to me they are two different functions.
But why is it important? If your fabric can stretch then why not just pull the ends a little to make them line up? Well sure you could do that and then you'd have a different tension along one side of the seam to the other, which can cause gathers (perpendicular ripples) along the seam ... indeed this is an actual technique for eliminating the side bust dart in some one piece patterns, and if that's your intended design it's fine. But why not make the stitch lines match when you start, before you compound the error with another design problem?
And why is it important if they don't sew up at the same length? Sounds like a basic question? Well if they don't, when you open up the pattern pieces you will have a step across the seam that will make it difficult to add things like elastic, other pattern pieces or hem the garment. Things need to line up!
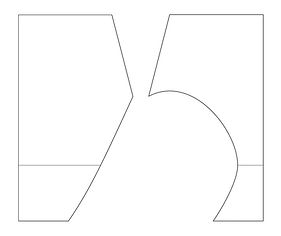
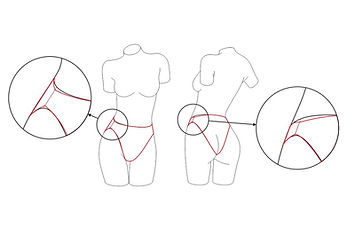
To demonstrate truing and finishing I'm going to focus on the bottom block (left image above) because this is what 90% of people get wrong (I'm not kidding) ... and the tension issues that go with it. I may add other areas of concern to the end of this tutorial later.
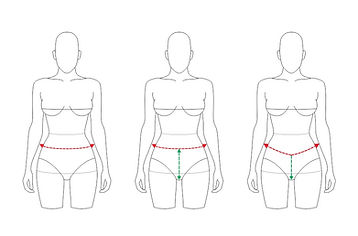
When we think about a bikini bottom and tension we think about horizontal negative ease ... the tension around the body at the top of the bikini (right image, leftmost illustration). I use 12% negative ease in swimwear so that's a fair amount of tension going around the body, but what about vertical tension (right image, center illustration)? Most people think that once you cut the waist in half there's no tension on the vertical and indeed my patterns don't include negative vertical ease ... but there's still tension there.
The tension comes from two places: firstly the position to where you pull the garment up the body and secondly when you stretch something horizontally it contracts vertically, creating its own tension. Then you need to consider the elastic around the waistband ... whilst that's helping to anchor the vertical height, really it's doing so by increasing horizontal tension only ... there's a constant struggle for balancing these two tensions and it varies depending on the elastic, the fabric, the width of the side strap and any other features that might be involved. Essentially the tension looks like the right image, rightmost illustration ... the horizontal tension line isn't horizontal anymore, but it dips downward in the center and becomes three different vectors. I talked about this more in the page about tension.
When it comes to designing bottom separates patterns, this is critical to understanding: the section above the two red vectors in the rightmost illustration has very little vertical tension in it so any bikini bottom designed with a square top line (see left image below) is prone to gaping in the front of the waist band even with elastic, horizontal ripples between the two front quarter lines, lining rolling in reversibles, and side straps dropping down the body. The problem is that this design is very, very common right now among amateur PDF pattern designers and there's a large number of people experiencing problems and thinking it's their fault when really the fault is with the pattern ... let's explain further ...

The tension vector is not parallel to the waist band ... it's dropped in the middle as we saw before. The anchor point for the vertical tension is not at the actual top of the garment but the point at which all three vectors coincide ... this is the nature of stretch. But wait there's more! Lets put the front and back panels together at the side seams like we saw in the video (left image below)? I've illustrated this with the stitching lines being the same length as they're supposed to be, but there is no smooth transition between the front and back panels ... they join at an angle. The response from one pattern designer recently was "so what, the elastic will smooth that off" ... well yes an no ... it will force out the angle, but one side of the elastic will be stretched way more than the other causing it to flip over or roll ... or worse, if the angle is steeper on one side of the seam than the other (different tension distribution front to back) the outer elastic edge will cork screw towards the side with the higher tension ... or even more so along the seam of a reversible garment without elastic: the center front or back lining fabric gets actively pulled out to show on the right side, showing the seam line and contrasting fabric colour that utterly destroys the clean aesthetic they're apparently after.
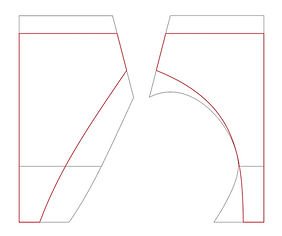
I've been told that if you don't use elastic then there is no problem with an angled seam ... well if that's the case the effect you'll get is the one in the right image below (red lines) where visually it looks like the side seam is too short ... it also gets ripples either side of the seam parallel to the top and bottom edges of the garment. You can only get away with an angled seam if the edge is elasticated AND the elastic is stitched/fixed into a Vee like you get with a center front Vee neckline. In the case below, take a look at the center back waist ... it's higher than the top of the side seam so it's not inside the tension line at all ... thus the elastic tension will pull it down until it is inside that line making the horizontal ripples at center back and feeling like you need to pull up the garment all the time.
What's needed to fix this pattern is a smooth transition from front to back (the black line in the above right image) ... but how do we do that? Well it's a simple matter of smoothing everything off with a gentle curve just like you saw in the video earlier. But hey that makes the width of my side seam too big ... yes it's now bigger ... if you want it smaller then lower the top line or raise the bottom line ... just don't angle it to a point. You may also notice that if you curve the leg line smoothly with a new line tangential to the existing lines then the apex of the leg line should naturally more forwards helping to stabilize the back panel (which goes a little bit towards lowering the likelihood of "hungry butt", although that's more to do with the seat width of the pattern).

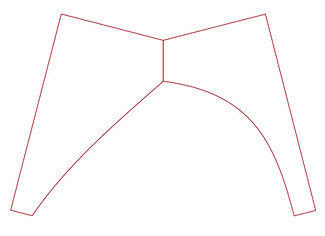
Ok let's take this one step further .... the green pattern design you see below is even more popular than the red pattern above ... almost every PDF swimwear site seems to have one. It's also a further exaggeration of the same issues as the red pattern. I've had a number of people asking why they're having problems with these. The image below right is what they look like when put together ... this is what apparently passes as a professional pattern design online!
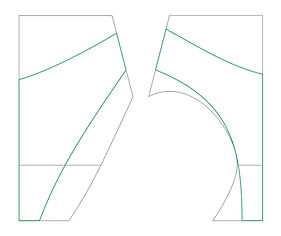

If you look at the image below the result before you apply elastic would be the peaks at the side seam ... while the top peak would be cut off by the overlocker when you apply the elastic (as suggested by two of the designers) it still wouldn't work and I'll show you why in a second. The leg line however can't even be elasticated on the round as they suggest because the gap is wider than the actual elastic! Assuming of course they even use elastic ... those who don't, get the whole reversible rabbit ear effect at the side seams before (I'm only guessing here) choosing to stitch it smoother after the fact .... why not just get it right on the pattern????

So if you followed my red pattern example and the advice of the pdf designer to use the elastic to smooth it off, you'd end up with the two images below. The lower leg line would be fine, but the top line would undulate .... instead of the center front and back being outside the tension line, now the top of the sides would be ... and this is what causes the roll over at the side seams and the band constantly dropping down the body ... you can't just let the overlocker (serger) cut off the excess. With deep Vee designs this is not the way to go.


Instead we have to take a different approach. We draw a line parallel to our Vee from the center of the side seam to the center front and back, then rotate the side seam square to that and then recurve everything smoothly. This ensures a smooth transition between pattern pieces AND ensures the top line is still parallel the tension vector (or inside it if the side seam is higher like in posing suits).

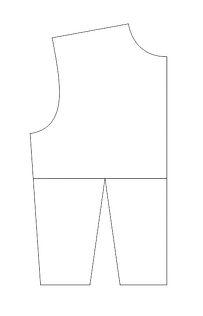
Obviously truing up a pattern and finishing to create a smooth transition from pattern piece to pattern piece is important for every seam in the garment, but it's also important for many intermediate steps as well. I tend to true and finish seam lines as I work through a design. An example might be like the bust dart below ... if I was given a square block like the image on the left (it might be the top half of a dress block for example) and I had to rotate the dart to the side (middle image) so that later a ruffle could be added to the lower hem, then I'd need to smooth off the angled waist line mid-design process (right image) so I could measure its length to use in my ruffle calculations.... this sort of thing is something you need to think about with every design line you cut!


Truing up a pattern to create a smooth transition from pattern piece to pattern piece is essential to a garment that sits flat, can be stitched properly and can have elastic applied without distortion ... in stretch garments this is critical. Please keep this principle in mind as we go through all the various pattern designs on this website.